Just built this in 8 hours with AI
Ai is wild. It only took me about 8 hours to build a full web app from scratch. Check this Upstate SC Wedding Directory out.
The Architect's View: Software & Strategy
Navigate Complexity, Lead with Vision, Architect Success
Ai is wild. It only took me about 8 hours to build a full web app from scratch. Check this Upstate SC Wedding Directory out.
Google has spent more than a decade and a significant amount of money determining how to create high-performing software teams. Incredibly, they have published their findings in a free document called the DORA report, which I have leaned on heavily in writing this article.
There is a huge difference between high and low performing teams, for example the highest performing teams have 127x faster lead time and 8x less change failures on average compared to low performing teams. One fantastic bit of news is that teams can change performance; Google found in the DORA report that teams become elite through continuous improvement and most elite teams started as average teams. To me this is very encouraging because we can take an average team and turn them into an elite team, thereby gaining multiples of speed improvement and huge reductions in deployment failures.
Not only does Google’s DORA report tell us that teams can make huge performance changes over time, but it also gives us some hints as to how leadership can promote these changes.
Vision – The leaders must set a direction and clearly layout goals
Inspirational Communication – Effective leaders make team member proud that they are part of that team through maintaining positive communication about the team and it’s direction.
Intellectual stimulation – Leaders present the team with new challenges and encourage the team to continually consider new ways of looking at old problems.
Supportive leadership – The best leaders have empathy and consider the feelings of those around them.
Personal Recognition – They publicly recognize superb work.
Each of these pillars is a deep topic in its own right, full of practical techniques and common pitfalls. That’s why, over the next few posts, I will be publishing a deep-dive on each one, turning these concepts into a concrete action plan for you and your team.
To ensure you don’t miss this series, follow me on LinkedIn. Or on my website at matw.me I’ll be starting next week with a deep dive into creating a team Vision that actually inspires.
Which of the five fundamentals do you think is most overlooked by leaders today? Let me know in the comments!
Does this sound familiar? Your team wants to make a simple change to the codebase, it should be simple anyhow, but you realize that instead of being a simple task, it’s going to take 2 engineers a week to make the change because of some complexity or lack of a solid deployment pipeline. This is not a one off occurrence, but you find it happening frequently.
Or maybe you are able to make quick roll outs, but you fear deployment day because of past regressions or worse maybe even an outage. These are completely avoidable scenarios, but without a solid plan, these are inevitable outcomes.
Tech debt shows itself in many ways, inflexible code where new features take a long time to develop and deploy, fragile code that has constant regressions, infrastructure that does not scale well with increasing demand, and even difficulty onboarding new team members. Tech debt is not always obvious, especially to those who are even slightly removed from the stack, instead of being a big obvious issue, it show up as diffuse and difficult to spot slowness and general issues. Its not like broken leg, where the reason you can’t run is obvious, it feels more like you are running on loose sand, you and your team are putting in effort, but little progress is being made. This is tech debt, well at least the symptoms of it. So if this is the symptoms, what is tech debt actually?
A teams tech debt is almost never one thing, but it’s a gradual (and inevitable if not planned for and dealt with) accumulation of small hinderances, typically introduced to save time in the moment in exchange for time cost in the future. Sounds a lot like financial debt actually doesn’t it? Anyway, sometime choosing a faster solution today that will cost time in the future is the correct choice. In fact, the most expensive option for now is almost never the correct choice even when it create efficiency in the future. Let me provide an example: Let’s say we are building a simple app that once we deploy it in the next couple weeks, we don’t expect to update it frequently, we could spend a few days creating a deployment pipeline that is fully automated after a git merge to the default branch. This would be very efficient in the future whenever changes were made, but since it will take a couple days to create this, and the fact that we don’t expect to make many changes, we should probably be willing to live with a manual deployment process even if this requires copying some files to a server manually or whatever the case may be. So that would now be tech debt, because in the future we know that it will take maybe 30 minutes or an hour to deploy changes instead of 10 seconds. Although this is tech debt, it probably acceptable. Now let’s consider how this acceptable tech debt could become unacceptable. Say this app becomes extremely popular, and as it becomes popular, new feature request start coming in weekly, also some of these new features add more services that require deployment and updating whenever releases are made. Now, a year later, the dev team is spending 3 hours a week just on deploying this app, furthermore deployment days are often met with a broken environment because someone forgot to update one of the now dozen services that this app now relies on. So what was one an acceptable compromise is now a burden, it has become significant technical debt and its costing the team time and customers will become frustrated with the unreliability. However, the team and company have become custom to this problem now and don’t even recognize it as tech debt, its just the way it is. A bit like the frog boiling in the pot as the heat slowly increases and therein lies one of the biggest problems with tech debt, it’s not always obvious as it slips in slowly.
Technical debt is a hidden roadblock that hinders team progress, effective leaders must recognize tech debt and advocate for its removal while implementing a strategy and creating a culture that will clear the path for future innovation, velocity, and creativity. However this approach must be pragmatic and recognize that resources are finite, so strategy and prioritization are important.
As mentioned earlier, tech debt slowly creeps in, this makes it difficult to recognize. Effective leaders must look for and recognize the roadblocks that are slowing your team down.
Once areas of tech debt have been spotted, the leaders next step should be to quantify the debt. Start by outlining the teams roadblocks, and then do a deeper investigations to determine and quantify the cost of the tech debt. Continuing with our previous deployment example, one could track how much time was spent monthly running deployments and compare that to how long deployments should take with an ideal pipeline. If your team spends 12 hours a month running deployments that could be fully scripted, then spending 40 hours to create a build pipeline is an obvious win since that time will be fully recouped within a few months. Not to mention a script is much more reliable than any hand run process.
Let’s look at another area of tech debt that is frequently overlooked or not recognized as tech debt, documentation. Without proper documentation, it is difficult to onboard new engineers. New engineers will also be frustrated when presented with a wall of new code, but no proper onboarding documentation or architectural overviews to help guide them. Best case scenario is that they reach out to another team member who spends time answering questions and helping onboard the new dev, but often this will only happen after the dev has spent hours trying to figure it out themselves. Furthermore, it could degrade the confidence of your new hires. Having proper documentation in place will make your team look professional to new hires, prevent frustration, and save countless hours. Proper documentation not only helps with new hires, but helps team members rotate through different projects efficiently, and helps refresh memory when devs come back to a project after some time. Proper documentation cannot replace good employee retention, but turnover is inevitable and having the documentation will help with loss of knowledge when team members leave. The leaders role is the same as with other areas of tech debt, he must recognize issues, put in place a plan for mitigation, and advocate for better documentation going forward.
Not everything can be planned for and the concept of “you are not going to need it” (YAGNI) is also sound. So I’m not advocating for always having the most sophisticated build pipelines and I’m not saying that a few manual deployment steps here or there are not permissible, but leaders have to be the voice of reason. The more a bit of code is touched, the better the pipelines must be for deployment. Documentation is always important. To be continued in a future part…
Arrays are an important data structure in Javascript. They allow you to store multiple values in a single variable. In Javascript, arrays can hold different types of data, such as numbers, strings, or even other arrays.
Once you have an array, you can perform various operations on it. Some common array operations include:
Javascript provides built-in array functions, such as push, pop, shift, and unshift, to add or remove elements from an array. You can also use the length property to get the number of elements in an array, and the forEach method to iterate over each element.
Here’s an example of how to add and remove elements from an array using the built-in functions:
let fruits = ["apple", "banana", "orange"];console.log(fruits); // Output: ["apple", "banana", "orange"]fruits.push("grape");console.log(fruits); // Output: ["apple", "banana", "orange", "grape"]fruits.pop();console.log(fruits); // Output: ["apple", "banana", "orange"]Besides the common array operations, there are advanced techniques that can help you manipulate arrays more efficiently. Some of these techniques include:
map, filter, and reduce to transform and aggregate array elementssplice to insert, replace, or remove elements at specific positionsslice to extract a portion of an arrayconcat to combine multiple arraysLet’s see an example of using the map function to transform an array of numbers:
let numbers = [1, 2, 3, 4, 5];let doubledNumbers = numbers.map(function(num) { return num * 2;});console.log(doubledNumbers); // Output: [2, 4, 6, 8, 10]
These advanced techniques can greatly simplify your code and make it more readable and maintainable.
In conclusion, arrays are a fundamental concept in Javascript programming. Understanding how to work with arrays, including common operations and advanced techniques, will empower you to write more efficient and powerful Javascript code.
Nearly every online application will need authentication and almost every page / feature of most applications will need to be locked behind the authentication wall. Since auth is so tightly integrated throughout an application, it is important that it is well abstracted, fast, and seamless. Authentication is basically “prove to me who you are” it’s kind of like showing your ID to a bank teller, or using your ID to gain access to your place of work. Authentication is closely related to the concept of authorization, but they are not the same, and thinking of them distinctly is important unless you have a basic application.
If having an ID is analogous to authentication, then having a key is analogous to authorization. You can be authorized to access something without being authenticated. Also you can be authenticated, but not authorized.
Examples:
Authenticated, but not authorized – If John Doe goes to the bank and shows his ID to the teller and tries to access money from Mark Moe’s bank account, the teller will say no of course. He is authenticated (as John Doe) but not authorized.
Authorized, but not authenticated – John Doe has tickets to a baseball game. When he enters the stadium, they take his ticket, but do not need to see his ID.
Software authentication typically uses one of following:
Probably the most common web authentication that users see is the password input, that uses something you KNOW to prove your identity. Some apps will use something you know for initial authentication, an example of this would be an online loan application.
Fingerprint scanners and face recognition are becoming popular on phones and laptops and use something you ARE to authenticate you.
When application message you a 6 digit code to your phone or email, they are using something you HAVE to authenticate you. Another example of something you have is a hardware authentication device.
Users will encounter authentication early and often when using your application, therefore it’s important to make it simple and easy to use. Later on in larger applications, the different services within your application will need to authenticate and/or authorize with each other often so a well abstracted auth mechanism is important there as well. Develops should give adequate attention to a smooth and simple to use authentication method that is also secure enough for the application.
Occasionally one may have the requirement to run make a lot of request or perform some other action on a large scale, but without overloading any systems.
An example issue, we need to check the status of 5000 different servers as quickly as possible without overloading the network or the requesting server.
Node gives us the ability to send all these request at once if we wanted. We could do that like:
// requestURLs is defined somewhere and is an array of 5000 urls
const axios = require('axios');
requestURLs.forEach((url) {
axios.get(url).then(requestHandler).catch(requestHandler);
}); // 5000 request will be sent out almost instantly
This solution has a major issues, the network and your server probably will have a difficult time processing those 5000 request when they start coming back with responses. The best solution is to throttle the request.
Here is a naive throttling function:
// requestURLs is defined somewhere and is an array of 5000 urls
const axios = require('axios');
const limit 20;

function throttle() {
  while(limit) {
    limit--;
    let url = requestURLs.pop();
    axios.get(url).then(requestHandler).catch(requestHandler);
  }
}

throttle();
Well this kind of works, 20 request go out and come back, but the rest of the request never go out. Once our limit is hit, the while loop exists and nothing else happens. How can this be fixed?
We have 2 issues:
1. Our limit never goes back up
2. Our throttle function never gets called again after it exits
Issue 1 is solved by incrementing our limit back up when request are done and issue 2 is solved by invoking throttle again.
Here is the finished result:
// requestURLs is defined somewhere and is an array of 5000 urls
const axios = require('axios');
const limit 20;

function throttle() {
  while(limit) {
    limit--;
    let url = requestURLs.pop();
    axios.get(url)
      .then(requestHandler)
      .catch(requestHandler)
      .finally(() => {limit++;});
  }
}

setInterval(throttle, 2000); // invoke throttle every 2 seconds
Now our throttle function gets invoked every 2 seconds and the throttle function will sent out request up to our limit.
Good quality code is a delight to work with, it is easily modified like clay to perform different actions. It is easy to debug and reason about. It is easy to understand and reads almost like a story.
Sometimes I am asked about best practices and code quality and it is a very difficult thing to explain. Furthermore, it is somewhat subjective. However I think many of the principles I learned during composition and rhetoric 101 apply to programming. Essentially good code doesn’t just happen, but it is planned and groomed into good code.
When writing an application or even a feature we have a choice about how we go about it. We could:
1. Have one large function that basically does everything
2. Write and string together functions within one file / controller that does everything
3. Write a class containing the logic needed for the feature and use class instances to perform actions
There is no universal answer to what is the right way. It’s going to depend upon the goals of the project and the scale of the feature and app. It takes time and experience to learn what is the best way for a given case and even then it’s normally not a clear cut decision. But as the expected size and life expectancy of an app / feature goes up, the more we want the code to be extensible and reusable (really this is always desired).
Writing code in self contained classes goes a long ways towards accomplishing this.
Examples of what happens given change of requirements for an application given the above 3 code choices. Let’s say we had a zoo application and we needed a way to feed and water the zoo.
Given the first style, with everything in one function we would be tempted to write the code like:
With the first scenario if we added another animal we would likely have to add more lines of code to feed and water the animal.
Now lets look at the second style, given we have broken things up into multiple functions, we probably wrote it more like this:
Declare function feedAnimal(animal) {

getFood(animal)

feedAnimal(animal)

}

Declare function waterAnimal(animal) {

getAndFillWaterBucket()

waterAnimal(animal)

}

Declare list animals [lions, tigers, bears, ...]

for each animal in animals {

feedAnimal(animal)

waterAnimal(animal)

}
So with the second style, you can see that if we need to add more animals to the zoo, all we have to do is add them to the animal list and they will get fed.
Now let’s look at the third style.
We would write a class that had basically the same functions from the above and it might look something like this:
ZooKeeper file –
ZooKeeper {

feedAnimal(animal) {

getFood(animal)

feedAnimal(animal)

}

waterAnimal(animal) {

getAndFillWaterBucket()

waterAnimal(animal)

}
}
ZooController file –
Declare list animals [lions, tigers, bears, ...]

for each animal in animals {

ZooKeeper.feedAnimal(animal)

ZooKeeper.waterAnimal(animal)

}
In this third case adding a new animal is the same as the second, so there is not a ton of advantage in that. But our controller is a bit cleaner and probably easier to read. But our class gives us some flexibility if we need to change our zoo app around more.
Say our zoo expands so much that we now added an aquarium section. In our first case we have to write even more code and its starting to get long, jumbled and difficult to manage. In our second case we probably have to write a second controller and rewrite most of the logic from scratch again. Now this is where our third case of writing a class really helps. When we add our aquarium we don’t want to water those animal so just adding them to our animal list won’t work, but we can write a new controller and use our ZooKeeper class and we already have most of our logic done.
AquariumController file –
Declare list aquariumAnimals [sharks, turtles, eels]

for each animal in aquariumAnimals {

ZooKeeper.feedAnimal(animal)

}
So you see that the first form has an advantage in initial simplicity especially for small apps that will likely not grow. The second style is good for apps that may see limited expansion. And the third for takes a bit longer to write initially, but usually pays off as apps and features grow and change.
Serverless architecture gives us an easy way to stand up an API without having to worry about managing a server. Like most decision, the decision to use serverless comes with a host of pros and cons; experience is here, ultimately the best teacher.
If you haven’t yet, go sign up for a free AWS account. Many of the services have a free tier. You can run this example without any cost.
Let’s use the classic pet store API for an example. We will have the following GET endpoints:
/animals-for-adoption – gets a list of all animals that are available
/info/{animal-name} – gets the info for an animal by the animals given name
Lambda’s are event driven functions that run on Amazon’s infrastructure. They look like any other function in JavaScript. Let’s make a simple Lambda function that returns a list of available pets.
In your aws account, go to Lambda, then create function. Then select “Author From Scratch”. Enter a name for the function, I used getPetsList. Set NodeJS for the run time and click CREATE FUNCTION.

In a few seconds you should see the Lambda panel for your new function. AWS has provided an IDE so you can edit your function online.
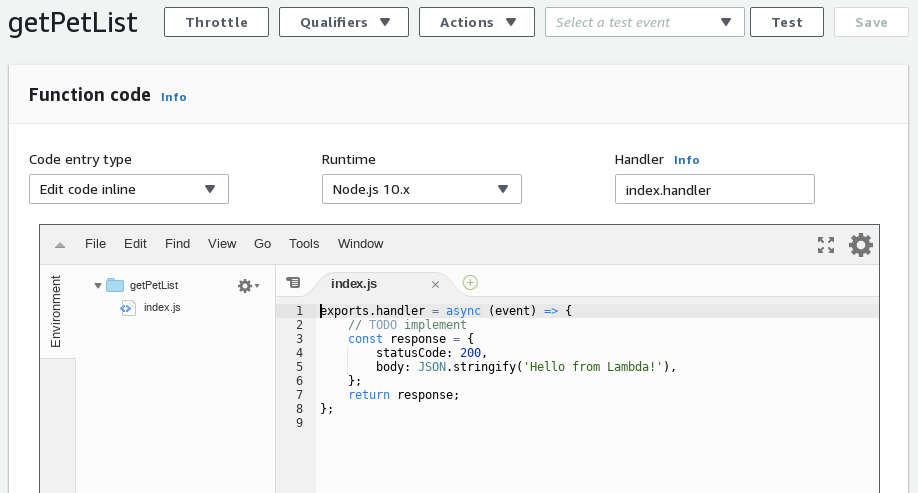
The Lambda is prepopulated with minimum boilerplate code. Here we can see that this file is actually a Node.js Module and it is “exporting” a function named handler. The handler function returns the response object.
exports.handler = async (event) => {
  // TODO implement
  const response = {
    statusCode: 200,
    body: JSON.stringify('Hello from Lambda!'),
  };
  return response;
};
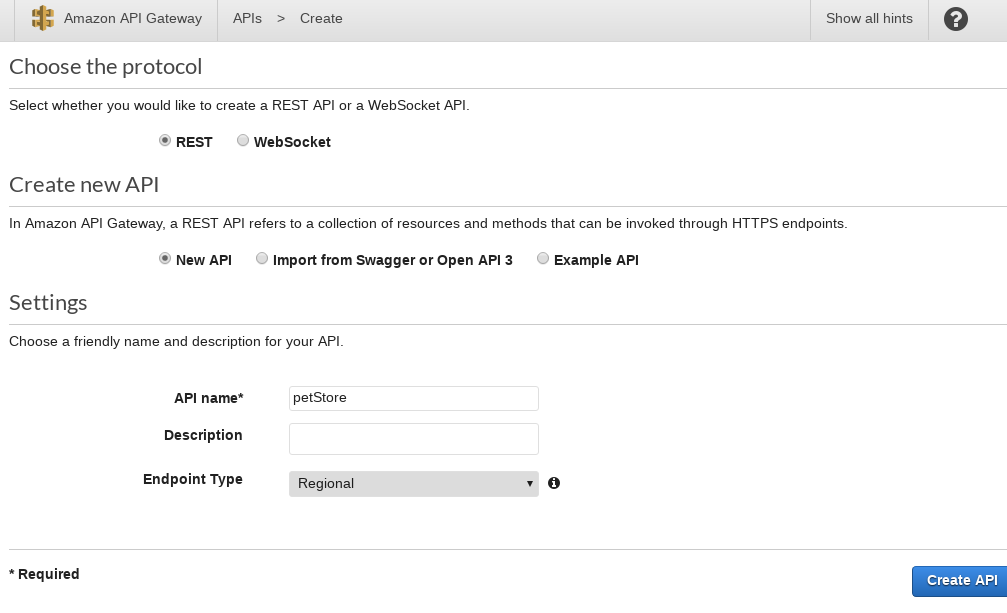
Let’s go to API gateway panel in AWS and hook this up. Click through till you get to the create API page. Select the following options: REST, New API, Regional and give your API a name. Should look something like:
After clicking the CREATE API, you will now have an API with no endpoints. That’s not very useful so let’s add our getPetList endpoint. Click the “ACTIONS” button and select “Create Resource” from the drop down list.
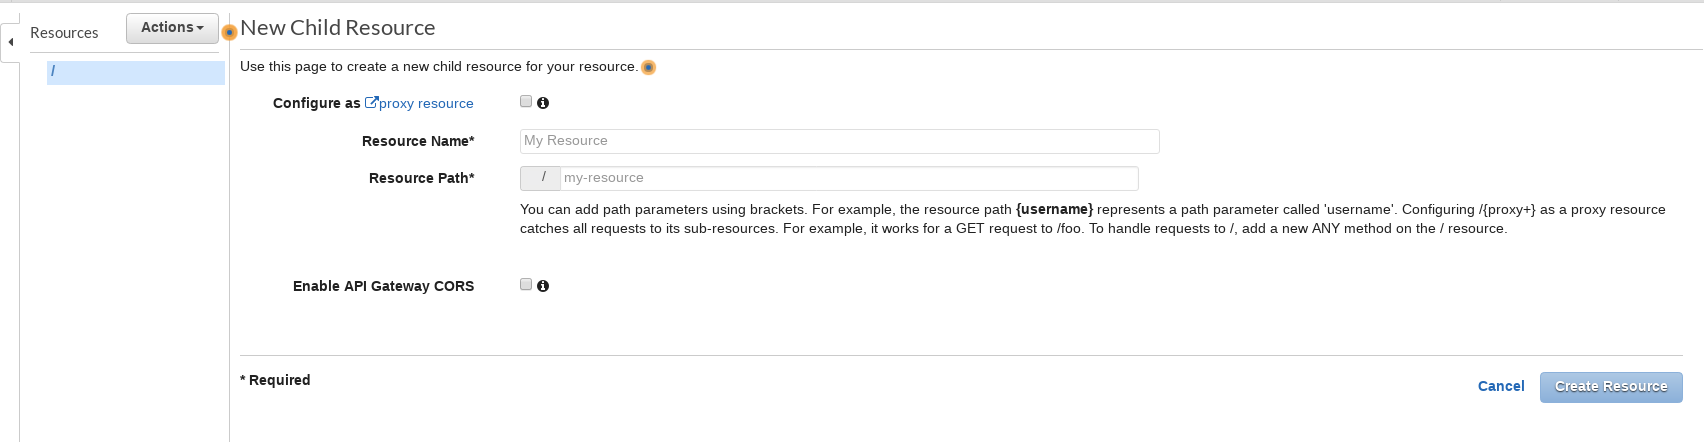
From here you can create a new resource (endpoint) for your API. Let’s create our endpoint “/animals-for-adoption”.
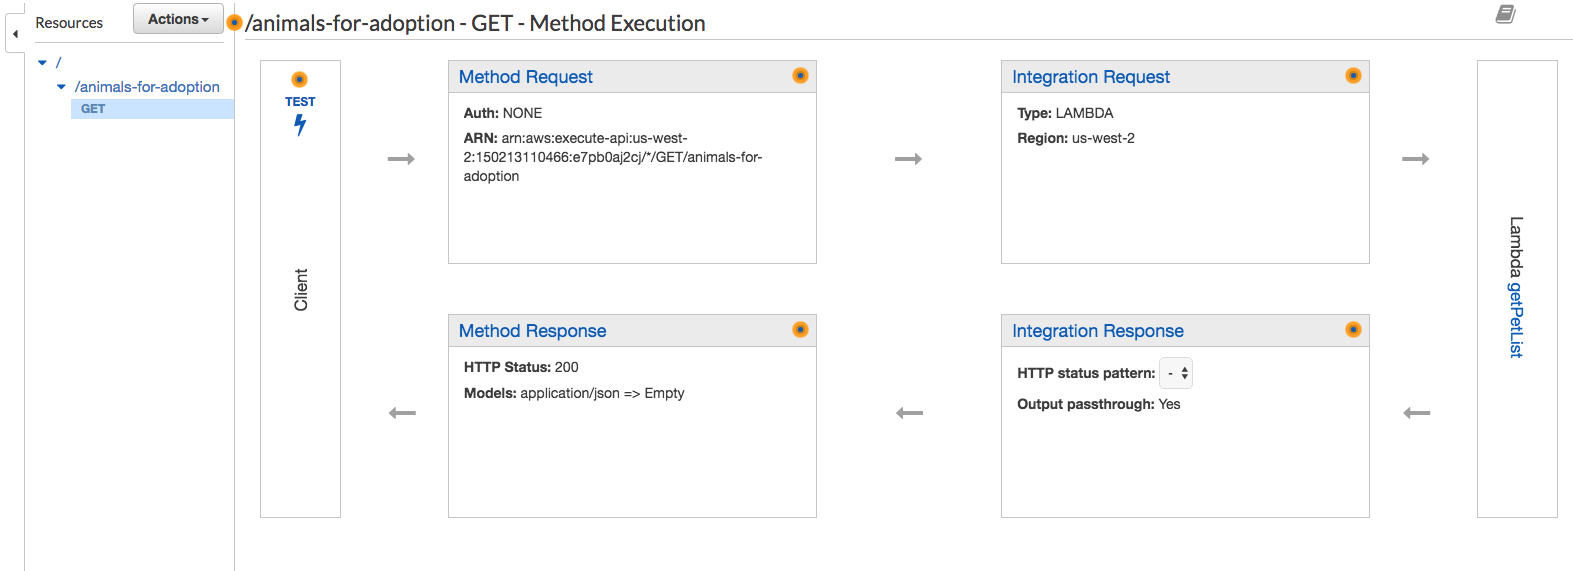
Enter “Get Pets” for the Resource name, and “animals-for-adoption” for Resource Path. Click “Create Resource” button and you should now see your path in the resources list. However we still need to add a method; we will add a GET method to /animals-for-adoption. With “animals-for-adoption” selected, click the Actions button again, then “Create Method” then select GET from the list.
After you click the check-box you should see something like:
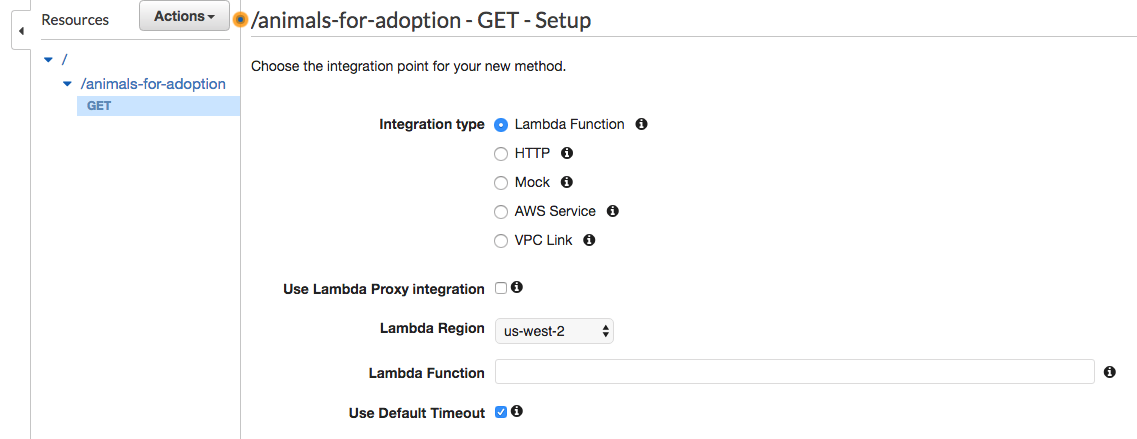
Since we are using a Lambda for our API backend, select Lambda and enter the name of the Lambda function in the input. Click save and then OK to set up the permissions automatically.
You should now see something like this:
Deployment is the last step. Once again click the “Actions” button. Look for the “Deploy API” option under applications. Clicking it produces a popup dialog:
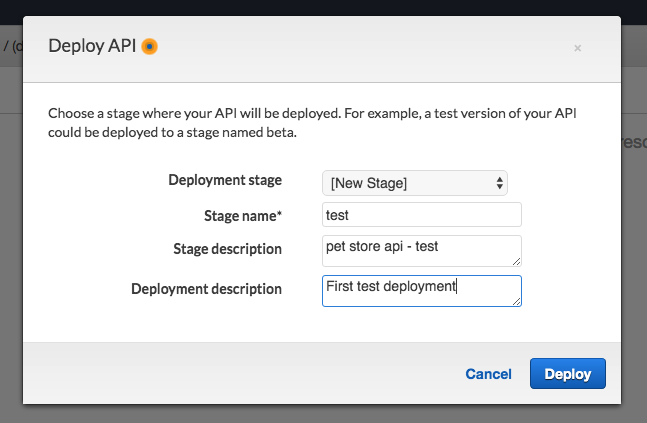
Fill it out like this and then click deploy.
After it deploys you should see an invoke url. In a browser, navigate to that url PLUS the endpoint /animals-for-adoption . You should get a response like:
{"statusCode":200,"body":"\"Hello from Lambda!\""}
You will need to update your lambda function to get the list of pets from the API, I will cover that in the next post.
The previous post showed how to select and edit every paragraph element on a page adding a smiley face to each paragraph, but we run the code by entering it directly in the Javascript console. How can we run a section of JavaScript code when something happens? Often we want a section of JavaScript code to run when a button is clicked. Let’s see how that is done.
Note that I am ignoring some best practices for the sake of simplicity.
Let’s add a button to our page using, <button>CLICK ME</button>. When we click the button, nothing happens.
Let’s say you got here and want to follow these instructions, but don’t know how. You can edit, create, and run HTML / Javascript code and html sections at: https://codepen.io/pen/
Well that does nothing and is pretty boring, so let’s make it do something.
Starting simple let make the button trigger an alert. Change the button code to:
<button onclick="alert('You clicked the button')">CLICK ME!</button>
to get this:
If you click on the button, you should get an alert box.
Now let’s make a button to add 🙂 to the end of each paragraph.
From the previous post we have this section of code that appends 🙂 to the end of each paragraph on a website.
allPTags = document.getElementsByTagName('p'); // Gets all our p tags
for (let pTag of allPTags) { // Loops through each p tag
  pTag.append(' :) '); // Add :) to each P tag
}
Let’s take this code block and smash it inside our button.
<button onclick="
  allPTags = document.getElementsByTagName('p'); // Gets all our p tags
  for (let pTag of allPTags) { // Loops through each p tag
    pTag.append(' :) '); // Add :) to each P tag
  }
">CLICK ME FOR SMILES!</button>
OK, I know this is really ugly, but it’s simple and it will work! We can clean this up in a later post.
Here is the result:
Click away! You will see that every click adds more smiles to the page!