How to Use Chrome DevTools and the Console Tab to Learn Javascript Programming

This post will show you how to open and use Chrome devTools on a desktop or laptop computer

The console and inspector were essential to me as a beginning developer and after 10 years experience I still use it almost daily.

First step (using Chrome) right click on your screen. Anywhere within the browser should work. A dialog menu box should appear.

right click menu

Click the “Inspect” button to open Chrome devTools.

The inspector has multiple tabs, we are interested in the “Console” tab.

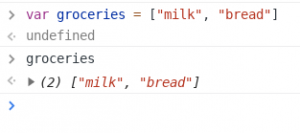
After clicking on the Console tab, you may see some text, errors, or other messages. Some websites even have hidden Easter eggs in the console. The important bit is that you can execute Javascript code here. For example, click just to the right of the > sign and enter 2+2, followed by enter. This should output the correct answer of 4. You can also do subtraction, multiplication 5*5, division 10/5, and a special one called modulus which gives you the remainder after a division operation. For example, 10%2 would equal 0, since there is no remainder, but 10%3 will return 1, since the “remainder” of 10 divided by 3 is 1.


The weird parts

So you saw how you can use the console tab as a calculator, but there are some strange things that can happen here. Check this out, add 0.1 and 0.2. Now I’m sure you can do this in your head, but go ahead and enter it into the console 0.1 + 0.2. You would expect the result 0.3, but it actually outputs something like 0.30000000000000004. Strange, isn’t it? This happens because Javascript uses floating point math. In short, it cannot accurately store nonintegers like 0.1. The math is close, but not exact.

Other Resources

They are a ton of great resources online to help get you started on your learning path.

Check out ” How to Learn JavaScript Properly” for encouragement and ideas for learning with others.

Also check out Alex Devero’s blog for learning and study tips.

Do you know any other weird parts of Javascript? If so, tell about them in the comments.

Javascript String Basics, How to Make and Edit Strings

Strings

Strings are sequences of characters. In the previous post, we saw how to open the Chrome devTool inspector panel. In the console tab, we can enter numbers and use the console as a basic calculator. When dealing with numbers in Javascript, we do not place quotes around them, but when entering strings, they must begin and end with a quotation mark. The quotation mark can be a single ' or a double " quotation mark. For example, to create a string with the text Hello World, type "Hello World" into the console then the return key to execute. This will cause the string "Hello
World"
to be repeated in the console. What’s happening here is the line is actually read in, then Javascript produces an actual string and then returns it. This returning of the string is what produces the second output of "Hello
World"
. The string is returned, but it is never saved, so it just vanishes in this example.

Declaring String Variables

Well, the previous example was not very useful – a string is created and then vanishes. To improve on this and do something a bit more useful, we need to save the string somehow. This is done by declaring a variable and the string as the variable’s value. Variables are declared with the keyword var followed by the variable name. For example, to declare a variable named myString, type var myString followed by enter. This will create a variable, yet the variable has no set value. The equal sign is used to set the variable’s value and the syntax to set a string value looks like variableName = “value”. So for our example, setting myString to Hello World, type myString = "Hello World" followed by enter. It is possible to combine the variable declaration and setting into one command like this var
myString = "Hello World"
.

Using Variables

OK, so the variable is declared and set, but it’s still not useful unless we can do something with the variable. Let’s declare one more variable named, myName and set it to “My name is ______” but go ahead and put your name there. So for me, it would look like var myName
= "My name is Matthew"
and then enter. Next, let’s put the two strings together. This is called concatenation. This is done using the + sign. Technically the + sign here is an operator, as it performs an operation. So putting the two together looks like myString + myName. Go ahead and try it. Well, that’s not quite correct – it returns “Hello WorldMy name is Matthew”. That’s pretty close, but some spacing would help us out. Let reassign (update) the myString variable. Let’s add a period and a space to it. This can be done by simply reassigning it as myString = "Hello World. ", but I’m lazy and don’t want to retype “Hello World” again. Instead, I can use a special operator call the concatenation operator which looks like +=. The += operator concatenates two string variables together and updates the first variable to the concatenated string. An example should help clear that explanation up. So continuing with our previous example, to update myString by adding a space and a period, we can simple use myString
+= " ."
. Don’t leave out those quotes! So if we did all that correctly we should be able to do myString
+ myName
ENTER and see “Hello World. My name is Matthew”.

Something neat

Let’s try something fun. In your Chrome devTools console, enter document.title = "Kittens". Now look at the top of the browser, and look at the tab title for the site. It now says Kittens. You just updated the document title with a new string.

So you now can “hack” and change the title of a website. Do you know any other string hacks? Leave a comment if you do.

How to Create Arrays and Lists in Javascript

In the previous post, we went over strings and variables, but we need methods to organize our strings and variables. If we were going to the grocery store, we would not write bananas on one piece of paper, bread on another, milk, eggs, cheese, etc each on separate pieces of paper. This would become very disorganized quickly. Instead, we create a list. Javascript has something very similar to a list called an array.

Grocery list

Let’s create a list called groceries. Let’s do this in the Chrome devTools console tab. How to open the console was covered in this post here. To make our grocery list we need to declare a new variable. Just like when we declared our string variable in the previous post, we will use the var keyword. However, to create the list we need to use a pair of square brackets []. We can make an empty list like this: var groceries = [], but this isn’t very useful. In order to have things in our list, we add them inside our brackets and separate them with a comma. Strings still need to be in quotes, so a list with milk and bread would look like:  var
groceries = ["milk", "bread"]
. Go ahead and give that a try, type that in and press enter. Now to see your list again, you can type groceries and hit enter.

Array of Numbers

Arrays can also hold numbers. Creating an array with a number is the same as with a string except you don’t place numbers in quotes. For example, var lotteryNumbers
= [4, 8, 15, 16, 23, 42]
.

Other useful array features

Arrays have some cool features that make them very useful. An array can tell you how many items it has with the length property. To check the length of our groceries list, we would use groceries.length. The dot here allows us to access the “Sub” properties of the array. The length is a property of all Javascript arrays. Along with length, arrays have a few functions that are also accessible by using “dot” after the array name. One of the most useful allows us to search an array to find the position of a specific entry (element). This property is called “findIndex”. Since it is a function, it has to be invoked. Functions in Javascript are invoked with a pair of parenthesis immediately after the function’s name. For example, if we had a list of students ordered by class rank, and we wanted to know John’s position, given the array var
students = ["Mary", "John", "Steve",
"Bob"]
(Looks like the parents of these students were not very creative in naming their children), we could enter students.indexOf(“John”) to find that John’s index is 1. Well, that may not have been what you expected, since Mary is the first student, but our indexes start with 0. So Mary’s index would be 0 and John’s would be 1.

I

f the item is not found, findIndex returns -1. It’s a common operation to use this in order to check if an item is in an array. The logic looks like this: “if findIndex of needle in haystack is -1 then the needle is not present”.

Arrays come with a lot of other properties and built-in functions. Check out this list on MDN to see what else an array can do. I’ll cover arrays in more detail in a later post.

Feel free to use the comment section to create some array examples.