Working with Arrays in Javascript

Introduction to Arrays in Javascript

Arrays are an important data structure in Javascript. They allow you to store multiple values in a single variable. In Javascript, arrays can hold different types of data, such as numbers, strings, or even other arrays.

Common Array Operations and Functions

Once you have an array, you can perform various operations on it. Some common array operations include:

  • Accessing array elements using their index
  • Adding elements to an array
  • Removing elements from an array
  • Iterating over an array
  • Sorting and searching arrays

Javascript provides built-in array functions, such as pushpopshift, and unshift, to add or remove elements from an array. You can also use the length property to get the number of elements in an array, and the forEach method to iterate over each element.

Here’s an example of how to add and remove elements from an array using the built-in functions:

let fruits = ["apple", "banana", "orange"];console.log(fruits); // Output: ["apple", "banana", "orange"]fruits.push("grape");console.log(fruits); // Output: ["apple", "banana", "orange", "grape"]fruits.pop();console.log(fruits); // Output: ["apple", "banana", "orange"]

Advanced Array Manipulation Techniques

Besides the common array operations, there are advanced techniques that can help you manipulate arrays more efficiently. Some of these techniques include:

  • Using mapfilter, and reduce to transform and aggregate array elements
  • Using splice to insert, replace, or remove elements at specific positions
  • Using slice to extract a portion of an array
  • Using concat to combine multiple arrays

Let’s see an example of using the map function to transform an array of numbers:

let numbers = [1, 2, 3, 4, 5];let doubledNumbers = numbers.map(function(num) {    return num * 2;});console.log(doubledNumbers); // Output: [2, 4, 6, 8, 10]
Codes on Tilt Shift Lens

These advanced techniques can greatly simplify your code and make it more readable and maintainable.

In conclusion, arrays are a fundamental concept in Javascript programming. Understanding how to work with arrays, including common operations and advanced techniques, will empower you to write more efficient and powerful Javascript code.

Where to start with code quality

Good quality code is a delight to work with, it is easily modified like clay to perform different actions. It is easy to debug and reason about. It is easy to understand and reads almost like a story.

Sometimes I am asked about best practices and code quality and it is a very difficult thing to explain. Furthermore, it is somewhat subjective. However I think many of the principles I learned during composition and rhetoric 101 apply to programming. Essentially good code doesn’t just happen, but it is planned and groomed into good code.

When writing an application or even a feature we have a choice about how we go about it. We could:
1. Have one large function that basically does everything
2. Write and string together functions within one file / controller that does everything
3. Write a class containing the logic needed for the feature and use class instances to perform actions

There is no universal answer to what is the right way. It’s going to depend upon the goals of the project and the scale of the feature and app. It takes time and experience to learn what is the best way for a given case and even then it’s normally not a clear cut decision. But as the expected size and life expectancy of an app / feature goes up, the more we want the code to be extensible and reusable (really this is always desired).

Writing code in self contained classes goes a long ways towards accomplishing this.

Examples of what happens given change of requirements for an application given the above 3 code choices. Let’s say we had a zoo application and we needed a way to feed and water the zoo.

Given the first style, with everything in one function we would be tempted to write the code like:

  • gets tiger food from the freezer
  • feeds the tigers
  • get bucket
  • fills bucket with water
  • water tigers
  • get lion food from the freezer
  • feed the lions
  • get bucket
  • fill bucket with water
  • water lions
  • …. on and so forth

With the first scenario if we added another animal we would likely have to add more lines of code to feed and water the animal.

Now lets look at the second style, given we have broken things up into multiple functions, we probably wrote it more like this:

Declare function feedAnimal(animal) {
getFood(animal)
feedAnimal(animal)
}
Declare function waterAnimal(animal) {
getAndFillWaterBucket()
waterAnimal(animal)
}
Declare list animals [lions, tigers, bears, ...]
for each animal in animals {
feedAnimal(animal)
waterAnimal(animal)
}

So with the second style, you can see that if we need to add more animals to the zoo, all we have to do is add them to the animal list and they will get fed.

Now let’s look at the third style.

We would write a class that had basically the same functions from the above and it might look something like this:
ZooKeeper file –
ZooKeeper {
feedAnimal(animal) {
getFood(animal)
feedAnimal(animal)
}
waterAnimal(animal) {
getAndFillWaterBucket()
waterAnimal(animal)
}
}

ZooController file –
Declare list animals [lions, tigers, bears, ...]
for each animal in animals {
ZooKeeper.feedAnimal(animal)
ZooKeeper.waterAnimal(animal)
}

In this third case adding a new animal is the same as the second, so there is not a ton of advantage in that. But our controller is a bit cleaner and probably easier to read. But our class gives us some flexibility if we need to change our zoo app around more.

Say our zoo expands so much that we now added an aquarium section. In our first case we have to write even more code and its starting to get long, jumbled and difficult to manage. In our second case we probably have to write a second controller and rewrite most of the logic from scratch again. Now this is where our third case of writing a class really helps. When we add our aquarium we don’t want to water those animal so just adding them to our animal list won’t work, but we can write a new controller and use our ZooKeeper class and we already have most of our logic done.
AquariumController file –
Declare list aquariumAnimals [sharks, turtles, eels]
for each animal in aquariumAnimals {
ZooKeeper.feedAnimal(animal)
}

So you see that the first form has an advantage in initial simplicity especially for small apps that will likely not grow. The second style is good for apps that may see limited expansion. And the third for takes a bit longer to write initially, but usually pays off as apps and features grow and change.

Using JavaScript to manipulate a webpage using tag names

This is a continuation on previous posts, Using JavaScript to Select HTML Elements, & How to use JavaScript to Interact With HTML Webpage. This will cover selecting HTML elements by tag names.

Note that I am ignoring some best practices for the sake of simplicity.

As a website loads, nodes (sections) of the page get loaded into the document object. The document object has methods that can be used to select, and manipulate the HTML page. Say we want to get all <p> tags on a website and add a smiley face to the end of each, how can we do that? The document’s method getElementsByTagName can fetch every <p> tag in a site and then we can modify each P element.

Let’s give this a try right now! Right click anywhere on this text (from a desktop / laptop) and then click Inspect from the popup menu. You should see a new window open somewhere. Inside this new window, open the console tab (See more instructions here). You can now run JavaScript code inside this console tab. In the blank area, to the left of the >, type or copy the following and then enter: document.getElementsByTagName('p').length You should see a number. That number is the total of <p> element on the webpage.

So back to adding a smiley face to the end of each paragraph.
Instead of jumping straight in, let’s do this gradually. Start by console.log each p tag:

allPTags = document.getElementsByTagName('p');
for (pTag of allPTags) {
console.log(pTag);
}

Now the output should look something like:

This is a list of all the <p> tags on the page. Now instead of console.log each of them, we can append (add) to them. We want to add a smiley face. Taking the same for loop and update it a little:

allPTags = document.getElementsByTagName('p'); // Gets all our p tags
for (let pTag of allPTags) { // Loops through each p tag
pTag.append(' :) '); // Add :) to each P tag
}

Go ahead and try it, it’s pretty funny. To undo it, just reload your page.

Next post will cover using a button to run the above code.

Need to learn more about HTML? Here is a good resource.

Using JavaScript to Select HTML Elements

One of the most common uses of JavaScript to manipulate elements on a web page. As we learned in the interact with the DOM post, the fist step to manipulating an HTML element is selecting it. The document object that is built into web browser’s JavaScript provides multiple methods that can be used to select an element.

I think it’s important to mention that you will commonly see jQuery mentioned in connection to selecting HTML elements. jQuery is a library (collection of methods and functions) that abstracts many commonly needed actions. I will not cover the use of jQuery in this post as I want to focus mainly on vanilla (plain) JavaScript. Under the hood, jQuery uses the same methods covered here. Old browser versions had inconsistencies in the document object and it’s methods that jQuery helped resolve. Most of these issues have been resolved and the methods covered here are included and standardized across all modern web browsers.

It is assumed that you have a basic understanding of HTML and CSS. If not, then you may find the following difficult to follow. I have placed some excellent HTML and CSS links here that will aid your HTML learning.

getElementById

The method getElementById is the easiest selector method to use. As the name suggests, it finds an element by using its id. Because every ID on valid HTML a page is unique, you know exactly what element it is returning. Of course the element you want to get must have an ID.

The getElementById method takes a string for a parameter and returns the element directly.

Take a look at this interactive code snippet:

See the Pen KbyWYB by Matthew Wilson (@matw) on CodePen.

We have an HTML paragraph with an ID of “foo”. To select this element we use the method getElementById and insert the name of the ID (in our case “foo”) as the first and only parameter. var mySelectedElement = getElementById("foo");.

So now mySelectedElement is set to our HTML element. Our element has many properties, but since in this example we want to change the color we need to update style.color. This can be reassigned to change the elements color and in our example we set it to equal “red”. If you are curious about the other properties on HTML elements see my post here.

getElementsByClassName

Because many elements on a page do not have an id, I find myself using getElementsByClassName a lot more frequently than getElementById. As you might guess from the name, this method returns an array-like-object that contains a collection of elements. This is unlike getElementById which directly returns one element. This means that if you are wanting to select one particular element, you will need to select it from your returned object, however in many cases you may want to perform an action on multiple elements. If this is the case and all your elements have the same class, then the getElementsByClassName works out well.

Let’s look at an example. Say we have a list of names and passwords and we want to hide the passwords on the click of a button. We could do something like this:

See the Pen
Using getElementsByClassName example
by Matthew Wilson (@matw)
on CodePen.

The document.getElementsByClassName('secret') returns an object populated with all the elements that have the class “secret”. We can then use a for..of loop to change the style of each element.

You should also know that getElementsByClassName can be called, not only from the document object, but from any element. It is important to note that it only finds matches that are children of the calling element’s node. This behavior is useful in many situations. Extending the previous example, let’s make our password list have several sections that can be hidden individually. Also let’s reverse the action, instead of hiding our passwords, let’s reveal them on click.

See the Pen
Using getElementsByClassName with children
by Matthew Wilson (@matw)
on CodePen.

There are a few things here that at first may not be clear, so let’s take a closer look. We are using a special keyword “this” as the first parameter in our on-click handler. If you look at the HTML you will see our button section looks like <button onclick="showSecrets(this)">HIDE SECRETS</button>. Here the “this” is actually sending in the button element as a parameter to the showSecrets function. Now we have our calling element inside our function and can use that to our advantage. Since our button and our list items both have a common parent element (the surrounding div) we can use that parent element to call getElementsByClassName and reveal only the passwords in that section.

As you can see from this example, we can use getElementsByClassName’s descendant-only matching behavior to our advantage. If it found every match on the page, we would have to use separate class names or another method to select only one section of passwords to reveal.

Coming soon – Part 2
getElementsByTagNames & querySelector

How to Use Chrome DevTools and the Console Tab to Learn Javascript Programming

This post will show you how to open and use Chrome devTools on a desktop or laptop computer

The console and inspector were essential to me as a beginning developer and after 10 years experience I still use it almost daily.

First step (using Chrome) right click on your screen. Anywhere within the browser should work. A dialog menu box should appear.

right click menu

Click the “Inspect” button to open Chrome devTools.

The inspector has multiple tabs, we are interested in the “Console” tab.

After clicking on the Console tab, you may see some text, errors, or other messages. Some websites even have hidden Easter eggs in the console. The important bit is that you can execute Javascript code here. For example, click just to the right of the > sign and enter 2+2, followed by enter. This should output the correct answer of 4. You can also do subtraction, multiplication 5*5, division 10/5, and a special one called modulus which gives you the remainder after a division operation. For example, 10%2 would equal 0, since there is no remainder, but 10%3 will return 1, since the “remainder” of 10 divided by 3 is 1.


The weird parts

So you saw how you can use the console tab as a calculator, but there are some strange things that can happen here. Check this out, add 0.1 and 0.2. Now I’m sure you can do this in your head, but go ahead and enter it into the console 0.1 + 0.2. You would expect the result 0.3, but it actually outputs something like 0.30000000000000004. Strange, isn’t it? This happens because Javascript uses floating point math. In short, it cannot accurately store nonintegers like 0.1. The math is close, but not exact.

Other Resources

They are a ton of great resources online to help get you started on your learning path.

Check out ” How to Learn JavaScript Properly” for encouragement and ideas for learning with others.

Also check out Alex Devero’s blog for learning and study tips.

Do you know any other weird parts of Javascript? If so, tell about them in the comments.

Javascript String Basics, How to Make and Edit Strings

Strings

Strings are sequences of characters. In the previous post, we saw how to open the Chrome devTool inspector panel. In the console tab, we can enter numbers and use the console as a basic calculator. When dealing with numbers in Javascript, we do not place quotes around them, but when entering strings, they must begin and end with a quotation mark. The quotation mark can be a single ' or a double " quotation mark. For example, to create a string with the text Hello World, type "Hello World" into the console then the return key to execute. This will cause the string "Hello
World"
to be repeated in the console. What’s happening here is the line is actually read in, then Javascript produces an actual string and then returns it. This returning of the string is what produces the second output of "Hello
World"
. The string is returned, but it is never saved, so it just vanishes in this example.

Declaring String Variables

Well, the previous example was not very useful – a string is created and then vanishes. To improve on this and do something a bit more useful, we need to save the string somehow. This is done by declaring a variable and the string as the variable’s value. Variables are declared with the keyword var followed by the variable name. For example, to declare a variable named myString, type var myString followed by enter. This will create a variable, yet the variable has no set value. The equal sign is used to set the variable’s value and the syntax to set a string value looks like variableName = “value”. So for our example, setting myString to Hello World, type myString = "Hello World" followed by enter. It is possible to combine the variable declaration and setting into one command like this var
myString = "Hello World"
.

Using Variables

OK, so the variable is declared and set, but it’s still not useful unless we can do something with the variable. Let’s declare one more variable named, myName and set it to “My name is ______” but go ahead and put your name there. So for me, it would look like var myName
= "My name is Matthew"
and then enter. Next, let’s put the two strings together. This is called concatenation. This is done using the + sign. Technically the + sign here is an operator, as it performs an operation. So putting the two together looks like myString + myName. Go ahead and try it. Well, that’s not quite correct – it returns “Hello WorldMy name is Matthew”. That’s pretty close, but some spacing would help us out. Let reassign (update) the myString variable. Let’s add a period and a space to it. This can be done by simply reassigning it as myString = "Hello World. ", but I’m lazy and don’t want to retype “Hello World” again. Instead, I can use a special operator call the concatenation operator which looks like +=. The += operator concatenates two string variables together and updates the first variable to the concatenated string. An example should help clear that explanation up. So continuing with our previous example, to update myString by adding a space and a period, we can simple use myString
+= " ."
. Don’t leave out those quotes! So if we did all that correctly we should be able to do myString
+ myName
ENTER and see “Hello World. My name is Matthew”.

Something neat

Let’s try something fun. In your Chrome devTools console, enter document.title = "Kittens". Now look at the top of the browser, and look at the tab title for the site. It now says Kittens. You just updated the document title with a new string.

So you now can “hack” and change the title of a website. Do you know any other string hacks? Leave a comment if you do.

How to Create Arrays and Lists in Javascript

In the previous post, we went over strings and variables, but we need methods to organize our strings and variables. If we were going to the grocery store, we would not write bananas on one piece of paper, bread on another, milk, eggs, cheese, etc each on separate pieces of paper. This would become very disorganized quickly. Instead, we create a list. Javascript has something very similar to a list called an array.

Grocery list

Let’s create a list called groceries. Let’s do this in the Chrome devTools console tab. How to open the console was covered in this post here. To make our grocery list we need to declare a new variable. Just like when we declared our string variable in the previous post, we will use the var keyword. However, to create the list we need to use a pair of square brackets []. We can make an empty list like this: var groceries = [], but this isn’t very useful. In order to have things in our list, we add them inside our brackets and separate them with a comma. Strings still need to be in quotes, so a list with milk and bread would look like:  var
groceries = ["milk", "bread"]
. Go ahead and give that a try, type that in and press enter. Now to see your list again, you can type groceries and hit enter.

Array of Numbers

Arrays can also hold numbers. Creating an array with a number is the same as with a string except you don’t place numbers in quotes. For example, var lotteryNumbers
= [4, 8, 15, 16, 23, 42]
.

Other useful array features

Arrays have some cool features that make them very useful. An array can tell you how many items it has with the length property. To check the length of our groceries list, we would use groceries.length. The dot here allows us to access the “Sub” properties of the array. The length is a property of all Javascript arrays. Along with length, arrays have a few functions that are also accessible by using “dot” after the array name. One of the most useful allows us to search an array to find the position of a specific entry (element). This property is called “findIndex”. Since it is a function, it has to be invoked. Functions in Javascript are invoked with a pair of parenthesis immediately after the function’s name. For example, if we had a list of students ordered by class rank, and we wanted to know John’s position, given the array var
students = ["Mary", "John", "Steve",
"Bob"]
(Looks like the parents of these students were not very creative in naming their children), we could enter students.indexOf(“John”) to find that John’s index is 1. Well, that may not have been what you expected, since Mary is the first student, but our indexes start with 0. So Mary’s index would be 0 and John’s would be 1.

I

f the item is not found, findIndex returns -1. It’s a common operation to use this in order to check if an item is in an array. The logic looks like this: “if findIndex of needle in haystack is -1 then the needle is not present”.

Arrays come with a lot of other properties and built-in functions. Check out this list on MDN to see what else an array can do. I’ll cover arrays in more detail in a later post.

Feel free to use the comment section to create some array examples.

How to Write Your First Function In Javascript

Functions are the basic building block of programming

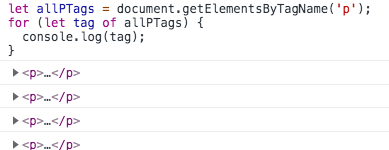
Now for the real meat of programming, functions. Functions are named sections of code that combine operations to perform a certain procedure. Functions can accept inputs and may return a value (an output). In the previous post, we started a bank and our first customer, John, deposited $500. Whenever John made a transaction, we had to add or subtract the transaction from his balance manually. This is a perfect use case for a function. By the end of this post, you should understand how to write a function that can do exactly that.

A very basic function

Let’s start by making a very basic function that calculates a tip for us. Given we want to always tip an even 15%, this is an extremely simple function to write. To calculate this in the console would just be cost * .15, but now, let’s make a function. We can declare a function with the var keyword, just like we declared strings, arrays, and objects. The var keyword is followed by the function name, an equal sign and then the function’s body. Let’s call our tip calculator function, “getTip”. Since our tip is based on the cost of a service or meal, our function will need a way to accept that value as an input. Parameters are used to provide inputs to functions and we will need to input the meal cost, so let’s make a parameter called “cost”. Now, our function would look like this: var getTip = function (cost) { return cost * 0.15 }. The return keyword causes whatever follows it on the same line to be “outputted” from the function, but the return keyword also stops further execution of code. Try creating this function in the console (see how to open here). After the function is declared, it’s stored under the named variable you assigned it to. So, if you used getTip, you can type getTip, followed by enter to see that it has successfully been declared as a function. This will not execute the function, but simply display it in the console.

Invoke a function

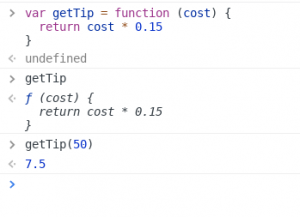
Now to invoke a function, we enter the function’s name followed by a set of parentheses. Inside the parentheses, we place the value (or values) of our parameters. So, to calculate a tip for a $50 meal, we would use getTip(50). This will “return” (“return” is the output of a function) us the tip amount, or in this case, 50 * 0.15, which is 7.5.

Bank deposit function

Our getTip function takes a parameter “cost”, performs a calculation using this parameter and then returns a value; however, not all functions must return a value. Some functions can perform an action and modify an existing object, but return nothing. In a previous post we used a bank as an example, let’s use that example again. First declare the bank object, var bank = {}, and then we can add John’s account directly bank.john = { accountType: "savings", balance: 500 }. This is slightly different than how the account was created in the previous post, but it does the same thing. Now, if we type bank and hit enter, we should see our bank object with John’s account on it. Great, our bank is loaded. Next, let’s create a function named deposit, that will make a deposit to John’s bank account. We can name this function “deposit”, and it will take the balance in John’s account and add to it whatever amount is passed into the parameter “amount”. Thus, it would look like:

var deposit = function (amount) {
  bank.john.balance += amount
}

We timed that perfectly, as John just won the lottery and is here to deposit his $1,000,000 winnings. Let’s give it a try deposit(1000000), and now we need to check John’s account balance, bank.john.balance. Wow, that worked great, John’s balance is now $1,000,500, and we didn’t have to do any manual update to his account balance. However, there is a problem here: this function works great if we only have one customer, but most banks have multiple customers, and they will not be happy if every time they each make a deposit, it winds up in John’s bank account. Fortunately, there are a lot of great solutions for this problem, and in future posts, we will cover fun and useful concepts like classes and inheritance that solve this and similar problems.

Practice

OK, in the comment sections, see if you can create functions to do some of the following:

  • Multiply a number by 2
  • Square a number
  • Make a greeting function that takes someones name and returns “Hello, [name here].”
  • Function to withdraw from an account
  • A function to add interest into a bank account
  • Or another problem you can think of