Month: November 2018
How to Create and Use Basic Objects in Javascript
Previous posts have covered strings, numbers, and arrays. Arrays can help organize related strings and numbers into a list-like behavior, but finding items in the list can be a bit difficult. Javascript offers one more method to organize data called an “object”. Objects store and retrieve items using a key – value system. For example, if you had an item located somewhere in a room full of lockers, you might tell someone to go and get me the contents of locker 15. In this example, the key is 15. Another example might be a phone book or encyclopedia (ancient relics of the past), where the key would be the subject title or person’s name and the value is the content.
Time to break some stuff
Ok, let’s go back to the console to look at this concept first hand. (First post covers opening the console) Let’s create a new object called “bank”. Enter the following into the console var. When you press enter, it will create a new object and store it as a variable named bank. To verify this, you can type bank and hit enter. The console will show you a set of brackets like {}. Now, most banks have accounts, so let’s add a few accounts to our bank. Good news, our first customer John just walked in and created a new savings account with $500. So we need to store at least two bits of information about John’s bank account, the balance, and the account type. For our bank, we need to store multiple bits of information about each account, the best way to do this is by using an object.
bank = {}
As you just learned, objects can store string and numbers, but they can also hold other objects. With that in mind, let’s create a new object called John. But this time instead of creating an empty object, we will create the object with John’s account information. Similar to when we created the bank object, we will use the var keyword and a set of brackets, but our brackets this time will not be empty. We will add the object’s data inside the brackets and each entry will be delimited by a comma. Each item entry is a key-value pair with a colon separator. So for John’s account it will look like var john =. There are a few things here I want to point out, as I hope to prevent you from confusion. First, you should notice that the “Keys” balance and accountType are not in quotes; this is because they are the “keys” and in the same way that our object name “John” isn’t required to be in quotes, they do not need them either. Now it is OK to add the quotes and
{balance: 500, accountType: "savings"}var john = would be perfectly valid. Second, string values need to be in quotes, but numbers do not. So now we have an object called bank and an object called account, but this is not very useful yet because we want John’s account to be part of the bank variable.
{"balance": 500, "accountType": "savings"}
Putting it all together
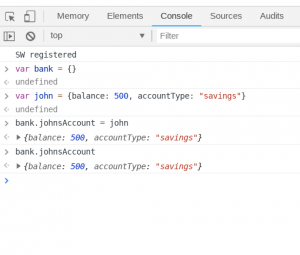 Now we need to add John’s account to our new bank. With John’s account, we added the values during the object creation, but we created the bank as an empty object. Now we can add John’s account object to our bank object. There are a few ways to add to objects, here I will cover “dot notation”. Adding a subobject to an outer object looks like outerObject.subObject = “value” keep reading a bit if that is confusing. Hopefully, our bank example will help. We already created our empty bank with
 var, now to
bank = {}
add John’s account to our bank with the key, “johnsAccount” we enter bank.johnsAccount. Great, now our bank has a new customer named John and we can access his account info using the same dot notation
= johnbank.johnsAccount This will return us John’s account details.
Bonus material
John just came back in and deposited an extra $100, now we need to update his balance, how can we do this? To update John’s account, we can use the dot notation to access his balance and update it. To add $100 we could set it to 600 using bank.johnsAccount.balance, but we could instead let Javascript do the math. There are a few special operators for add, subtract and other math functions. To add to a variable, we can use the
= 600+= operator. This is called the “plus assignment” operator. It’s called “assignment” since it does the math and reassigns the variable of the output. If we wanted to add 100 to the balance without using the assignment operator, it would look like this: bank.johnsAccount.balance =. However, using the assignment operator shortens the statement quite a bit to just
bank.johnsAccount.balance + 100bank.johnsAccount.balance += 100. Running this will update the balance by adding $100. There is also the -= assignment operator which works the same way, but of course, subtracts.
Strange behavior
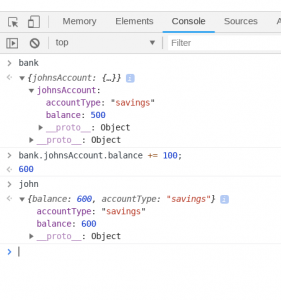 There is one strange side effect of changing the bank balance. We updated bank.johnsAccount.balance, but what about our original variable of john? It turns out that it gets updated too. Take a look, type john in the console and hit enter and you will see that john.balance has been updated. This is because bank.johnsAccount wasn’t just set to the value of “john”, it actually is a reference to the variable john. Updating one changes the other as well.
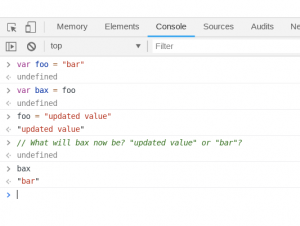
This is a special feature of objects, this same behavior is not repeated with string or number variables. For example, varfollowed by
foo = "bar" var bax = foo of course sets bax to the value of foo, which is then the string “bar”. You might think that changing foo would also change the value of bax, yet it doesn’t.
Can you think of some good uses for objects? Leave me some examples in the comments. Remember to practice what you are reading. When I was first learning, I could read and read, but it only “sunk in” once I practiced it. So go ahead and open up that console.
How to Write Your First Function In Javascript
Functions are the basic building block of programming
Now for the real meat of programming, functions. Functions are named sections of code that combine operations to perform a certain procedure. Functions can accept inputs and may return a value (an output). In the previous post, we started a bank and our first customer, John, deposited $500. Whenever John made a transaction, we had to add or subtract the transaction from his balance manually. This is a perfect use case for a function. By the end of this post, you should understand how to write a function that can do exactly that.
A very basic function

Let’s start by making a very basic function that calculates a tip for us. Given we want to always tip an even 15%, this is an extremely simple function to write. To calculate this in the console would just be cost * .15, but now, let’s make a function. We can declare a function with the var keyword, just like we declared strings, arrays, and objects. The var keyword is followed by the function name, an equal sign and then the function’s body. Let’s call our tip calculator function, “getTip”. Since our tip is based on the cost of a service or meal, our function will need a way to accept that value as an input. Parameters are used to provide inputs to functions and we will need to input the meal cost, so let’s make a parameter called “cost”. Now, our function would look like this: var getTip = function (cost) { return cost * 0.15 }. The return keyword causes whatever follows it on the same line to be “outputted” from the function, but the return keyword also stops further execution of code. Try creating this function in the console (see how to open here). After the function is declared, it’s stored under the named variable you assigned it to. So, if you used getTip, you can type getTip, followed by enter to see that it has successfully been declared as a function. This will not execute the function, but simply display it in the console.
Invoke a function
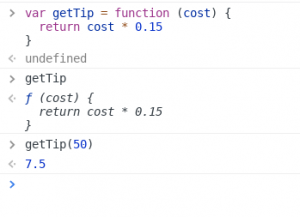
Now to invoke a function, we enter the function’s name followed by a set of parentheses. Inside the parentheses, we place the value (or values) of our parameters. So, to calculate a tip for a $50 meal, we would use getTip(50). This will “return” (“return” is the output of a function) us the tip amount, or in this case, 50 * 0.15, which is 7.5.
Bank deposit function
Our getTip function takes a parameter “cost”, performs a calculation using this parameter and then returns a value; however, not all functions must return a value. Some functions can perform an action and modify an existing object, but return nothing. In a previous post we used a bank as an example, let’s use that example again. First declare the bank object, var bank = {}, and then we can add John’s account directly bank.john = { accountType: "savings", balance: 500 }. This is slightly different than how the account was created in the previous post, but it does the same thing. Now, if we type bank and hit enter, we should see our bank object with John’s account on it. Great, our bank is loaded. Next, let’s create a function named deposit, that will make a deposit to John’s bank account. We can name this function “deposit”, and it will take the balance in John’s account and add to it whatever amount is passed into the parameter “amount”. Thus, it would look like:
var deposit = function (amount) {
  bank.john.balance += amount
}
We timed that perfectly, as John just won the lottery and is here to deposit his $1,000,000 winnings. Let’s give it a try deposit(1000000), and now we need to check John’s account balance, bank.john.balance. Wow, that worked great, John’s balance is now $1,000,500, and we didn’t have to do any manual update to his account balance. However, there is a problem here: this function works great if we only have one customer, but most banks have multiple customers, and they will not be happy if every time they each make a deposit, it winds up in John’s bank account. Fortunately, there are a lot of great solutions for this problem, and in future posts, we will cover fun and useful concepts like classes and inheritance that solve this and similar problems.
Practice
OK, in the comment sections, see if you can create functions to do some of the following:
- Multiply a number by 2
- Square a number
- Make a greeting function that takes someones name and returns “Hello, [name here].”
- Function to withdraw from an account
- A function to add interest into a bank account
- Or another problem you can think of
How to Add Javascript to an HTML Webpage
Until recently, using JavaScript meant was reserved strictly to building websites, but today, Javascript runs pretty much everywhere. That being said, the most common application for JavaScript is still to manipulate websites or make a web-based application. There are two ways that JavaScript code can be loaded and/or added to a webpage: inline scripts and external scripts.
Practicing these examples will help you start your journey of learning JavaScript. You will need a simple text editor to make your website files. Don’t use a word processor, because they adds hidden tags to format documents, and while these tags are useful for producing formatted documents, they are not compatible with HTML.
To begin, you can open a valid HTML file with your browser. There are a few ways to do this, and the easiest way is to right click the file and use “Open With” to open the file with a web browser. For more information, visit https://www.codecademy.com/articles/local-web-page
Using inline scripts to add Javascript to a web page
Let’s open our editor and create a basic webpage using the following code:
<!DOCTYPE html>
<html>
    <head>
        <title>Hello Javascript</title>
    </head>
    <body>
        <h1>Webpage works!</h1>
    </body>
</html>
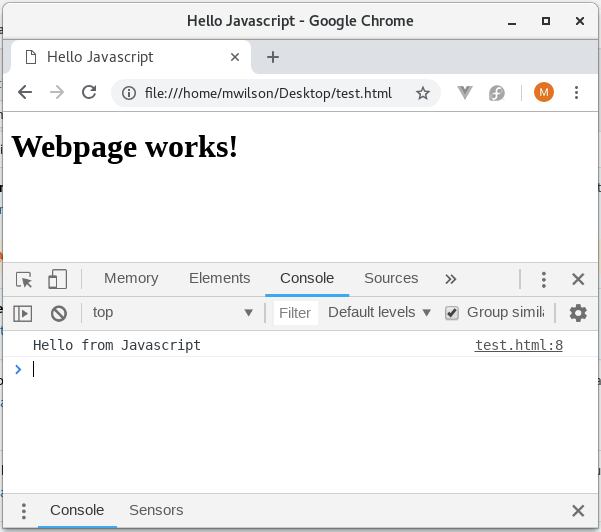
After saving and opening the file, you should see the bold title “Webpage works!” when you view that file in a browser. So now let’s add some JavaScript.
JavaScript can be added directly to an HTML webpage by adding it inside script tags <script> /*javascript code goes here */</script>. There is a function console.log that allows us to output values to the console. Let’s use it in our first script. Let’s insert a set of script tags inside our previous HTML code with console.log('Hello from Javascript') inside. Our completed HTML should now look like:
<!DOCTYPE html>
<html>
    <head>
        <title>Hello Javascript</title>
    </head>
    <body>
        <h1>Webpage works!</h1>
        <script>
            console.log('Hello from Javascript')
        </script>
    </body>
</html>
Now open that page in a web browser. With the console open, you should see the words “Hello from JavaScript”.
Adding external Javascript files to a web page
Inline scripts are fine for smaller sections of code, but they are not ideal for larger projects. Thankfully we can solve this problem by using external scripts. To demonstrate this, let’s write some JavaScript in a separate file and then include it into our page with the same script tags as above, but with one modification.
To do this, we can use an attribute within the script tag which looks like: <script src="file.js"></script>. The “src” stands for source, and it defines where the webpage can find the script file. So to add an external script to our example web page, let’s save a JavaScript file in the same folder as our HTML file and name it “example.js”. Using our text editor again, add the console.log('Hello from Javascript') . Let’s also add another line, console.log('I am an external script'). So our example.js file should look like:
console.log('Hello from Javascript')
console.log('I am an external script')
Once that is done, we need to go back to our HTML file and update our script tag. By having the two files in the same folder, all we have to do is add our Javascript file name to the “scr” attribute. So your HTML file will look like:
<!DOCTYPE html>
<html>
    <head>
        <title>Hello Javascript</title>
    </head>
    <body>
        <h1>Webpage works!</h1>
        <script src="example.js"></script>
    </body>
</html>
As long as we entered everything correctly and the files are in the same folder, opening the HTML file with a web browser should look like:

You can see both of the console.log statements printed their values into the console. It’s important to note, however, that if the file was in a different location or named incorrectly, our browser would try to load the file but would return an error instead. This would look like:
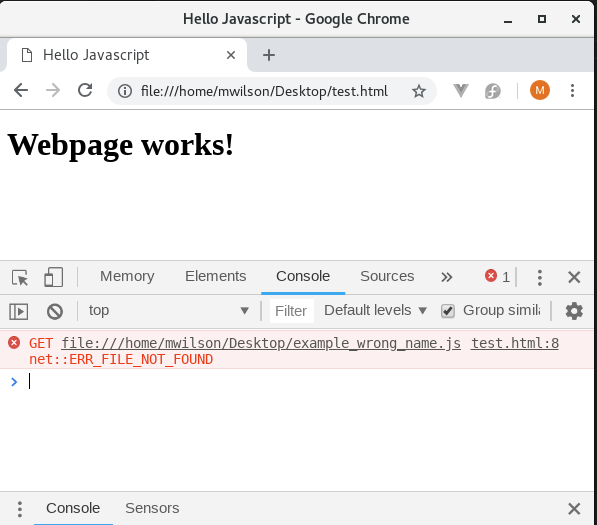
And our console.log would never show, of course.
That’s all there is to it! I also added a special file to this page, and it is logging a question for you in the console. Please take a look and answer the question in the comments.
please feel free to checkout out one of my projects AEROTRAKS.COM