One of the most useful aspects of JavaScript is its ability to manipulate a website. When a pure HTML website loads, that’s it—it’s done and it will not change again until the page is reloaded. Adding JavaScript to a page, however, gives us the ability to update a page even after it has been completely loaded. We’re going to be using the Chrome devTool’s console for this post, so if you don’t know how to open it and use it, please check out the console post for more info.
The HTML Document
The HTML document is composed of elements that are created using tags. HTML tags have the standard format <tagname>Content</tagname>
, and they describe the type of content they contain. For example, to indicate the beginning and end of a paragraph, the content is wrapped using a “p” tag: <p>The paragraph goes here.</p>. W3 School has a great in-depth article here covering HTML tags.
When using JavaScript to manipulate an HTML document, we can use the tags as a road map to navigate and select the document section we want to manipulate.
What is the DOM
When dealing with JavaScript and HTML you will likely hear people refer to the DOM. DOM stands for Document Object Model, and it is essentially an interface that allows JavaScript to access the web page “document.”
To illustrate this point, imagine a string puppet for a minute. If you think of a web page as a puppet, then the DOM could be thought of as the strings and the points at which they attach to the puppet.

Using this same analogy, JavaScript would best be compared to the stick that controls the strings. The DOM allows us to connect JavaScript and HTML together.
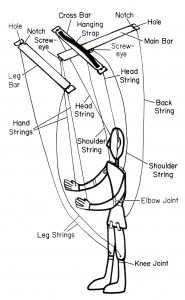
Included with a browser’s JavaScript version is an object called the “document.” It is on this object that we can find methods that allow us to interact and manipulate the DOM. Continuing with the analogy, the puppet control sticks have multiple “methods” or actions that can be used to manipulate the puppet.
The DOM is made up of elements that are connected in a tree-like structure. The elements of this tree are objects, and they can be accessed from the root document object mentioned in the previous paragraph.
Navigating the DOM
Before we can manipulate a section of the DOM, we first need to know how to select an element. To help with this, I’ve made a very simple web page that you can experiment with: http://matw.me/example.html. Open this page in a new tab and follow along.
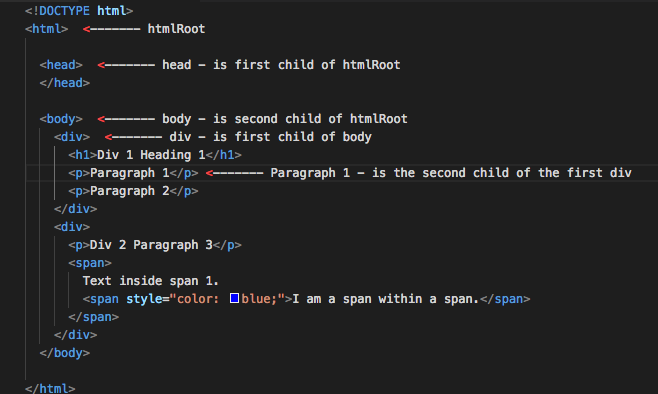
Here is what the HTML code of this example.html page looks like:
<!DOCTYPE html>
<html>

  <head>
  </head>
  <body>
    <div>
      <h1>Div 1 Heading 1</h1>
      <p>Paragraph 1</p>
      <p>Paragraph 2</p>
    </div>
    <div>
      <p>Div 2 Paragraph 3</p>
      <span>
        Text inside span 1.
        <span style="color: blue;">I am a span within a span.</span>
      </span>
    </div>
  </body>
</html>
As you can see, it’s a fairly simple page. There is an inline style to color the nested span blue, but not much else is going on. First off, let’s change the text of the first paragraph.
Before we can manipulate the first paragraph, we have to select it. There are many ways to select an element on a page—you can get elements by class name, id, tag name, or by “walking” up and down the DOM tree. Since the “document” is the DOM root, everything on the web page is a child of the document.
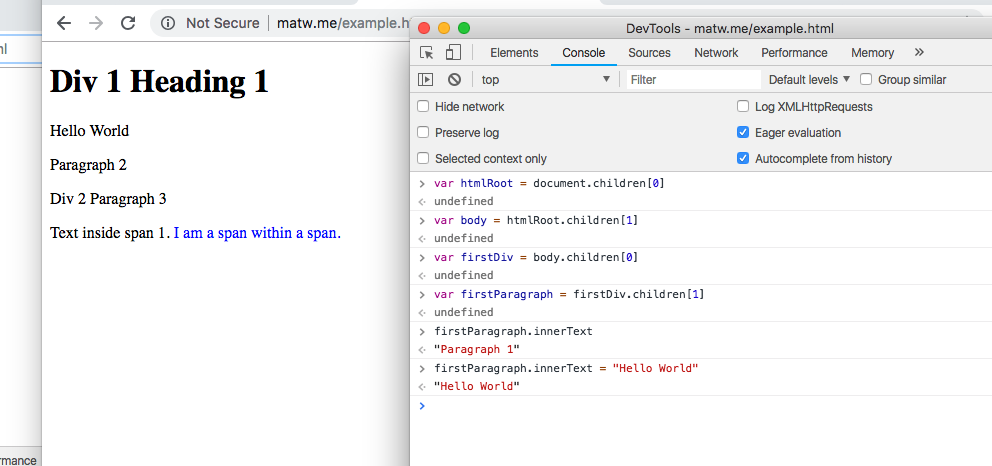
This may be a bit difficult to understand, so let’s take a closer look at it. Go to the example.html page and then open the console. Then type in document.children and press enter. The console should look something like:
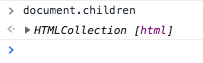
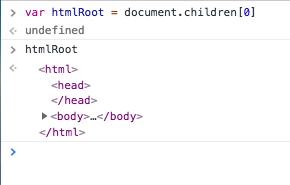
Now click the triangle to expand the HTMLCollection object. Can you see how it compares to our HTML code? The first and only child element is the “html” object. This is the root from which everything else on the page stems. Since this is an object, we can save it to a variable. To do that, use var htmlRoot = document.children[0] and press enter. We have to add [0] to the end of our document.children because we want the first child. In JavaScript, the first item is item 0. Now our variable htmlRoot is a reference to the DOM’s html object. Looking back at our page code, you can visualize what this variable references on the page.
Let’s take a look at the HTML’s hierarchical structure:
In the console, we can view the content of our htmlRoot variable. Enter htmlRoot and you should see:
In a tree form, this would look like:
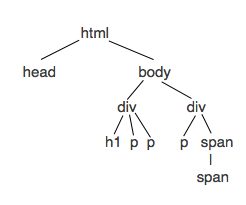
As you can see in the tree above, “html” has two children: “body” and “head.” If we want to navigate to the first paragraph, we have to go through the “body” and then the first “div.” The first paragraph will then be the second child.
Let’s return to navigating to our first paragraph element, and take it one step at a time. Remember the htmlRoot object we created earlier? This is the html element at the top of our tree, so if we enter htmlRoot.children, we should see that htmlRoot has two children: “head” and “body.”

We already know we want the body, which is the second child. Since our index starts at 0, htmlRoot.children[0] would refer to the head, and htmlRoot.children[1] would refer to the body. Let’s save the body as a new variable. We can do that with var body = htmlRoot.children[1], and pressing enter.
Now let’s look at our body variable:
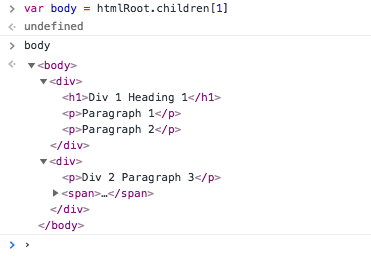
All the code entered to get here is recapped at the bottom of the page.
Well, I think that’s pretty neat. We now have a JavaScript variable that represents the HTML “body” element. Now to get that first paragraph, we need to go to the first child of the body, which is a “div” and then the second child of that div would be our paragraph (p element). That will be:
var firstDiv = body.children[0]
var firstParagraph = firstDiv.children[1]
In the console it would look like:
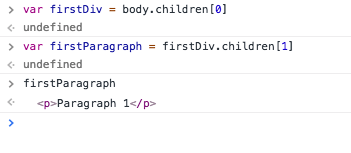
As you can see, we finally have our paragraph saved as a variable! Now we can manipulate the text, style, class, id, or other attributes of our “p” element. This style of selecting an HTML element by going up or down the tree using children or parent selectors is called “walking the DOM.” There are other ways to select elements on a page, but I will cover these in future posts.
Changing An Element’s Text With JavaScript
Let’s update the text in our first paragraph to say “Hello World.” Even though navigating the DOM and selecting the first paragraph was somewhat complicated, changing the text itself is very easy. The paragraph element, which is of course an object, has a property “innerText.” If we type firstParagraph.innerText, we will see the current text of the element returned.
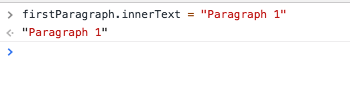
We can simply set this innerText to our new value and it will update the page.
firstParagraph.innerText = "Hello World"
Instantly, our text gets updated to “Hello World”.
Recap
In order to update a section of text on the screen, the first step we need to take is selecting the element’s DOM object. Then we can reassign the inner text. For this page, it looks like:
What’s next?
There are lots of methods that can be used to select elements from the DOM, and while many of them would have made selecting this element easier, in my opinion it is very important to learn how to navigate the DOM using a simple straight “walk down” as demonstrated here. Learning this method helps provide an understanding of what the DOM is and how it is structured.
In my next post, I plan to go over other “document” methods that will make navigating and manipulating the DOM simpler and faster.
In the meantime, play around with selecting DOM elements and updating them. Share some screenshots in the comments section.


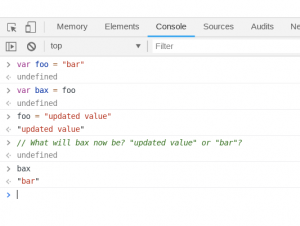
 Now we need to add John’s account to our new bank. With John’s account, we added the values during the object creation, but we created the bank as an empty object. Now we can add John’s account object to our bank object. There are a few ways to add to
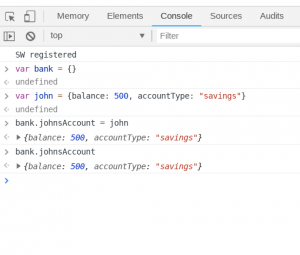
 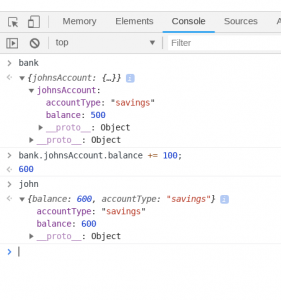 There is one strange side effect of changing the bank balance. We updated bank.johnsAccount.balance, but what about our original variable of john? It turns out that it gets updated too. Take a look, type john in the console and hit enter and you will see that john.balance has been updated. This is because bank.johnsAccount wasn’t just set to the value of “john”, it actually is a reference to the variable john. Updating one changes the other as well.